使用飞浆训练图片识别大模型 训练出身份证识别文字模型,并运用于python微服务中
本文章是记录使用几千张预训练身份证图片下,使用训练脚本对模型进行微调,并进行部署应用的全过程
paddleocr文字检测、识别大模型+部署+网络接口
训练模型前期准备:
准备运行环境 conda创建python虚拟环境最为合适,可以控制多版本
| 使用指令安装conda [Conda | Anaconda.org](https://anaconda.org/anaconda/conda) |
创建新环境
1
conda create --name 你的虚拟环境名 python=python版本号
之后按照项目的requirements.txt文件,创建python项目所需的所有依赖
1
pip install -r requirements.txt
安装paddlepaddle、paddleocr
此处我使用的是paddlepaddle 3.0.0版本 paddleocr 2.10.0 recv4 detv4
飞桨PaddlePaddle-源于产业实践的开源深度学习平台
1
 python -m pip install paddlepaddle-gpu==3.0.0 -i https://www.paddlepaddle.org.cn/packages/stable/cu126/
并且需要拉取paddleocr对应github仓库代码 使用其训练、、标注、导出、运行调用代码等等,我使用的是paddleocr 2.10.0 因此需要拉取分支2.10.0的:PaddlePaddle/PaddleOCR at release/2.10
拉取成功之后使用进入对应项目目录,执行以下脚本
1
2
3
4
5
conda activate 虚拟环境名 #激活此时虚拟环境
#使用脚本paddleocr.py去初步调用发布版本的模型,查看效果(也就是调用python类方法Paddleocr)

# 此时会出现让下载远端的推理模型
paddleocr --image_dir ./doc/imgs/11.jpg
之后可以看到此时识别打印的日志,是位置数组 + 识别内容,表示本地的paddlepaddle + paddleocr已经安装成功 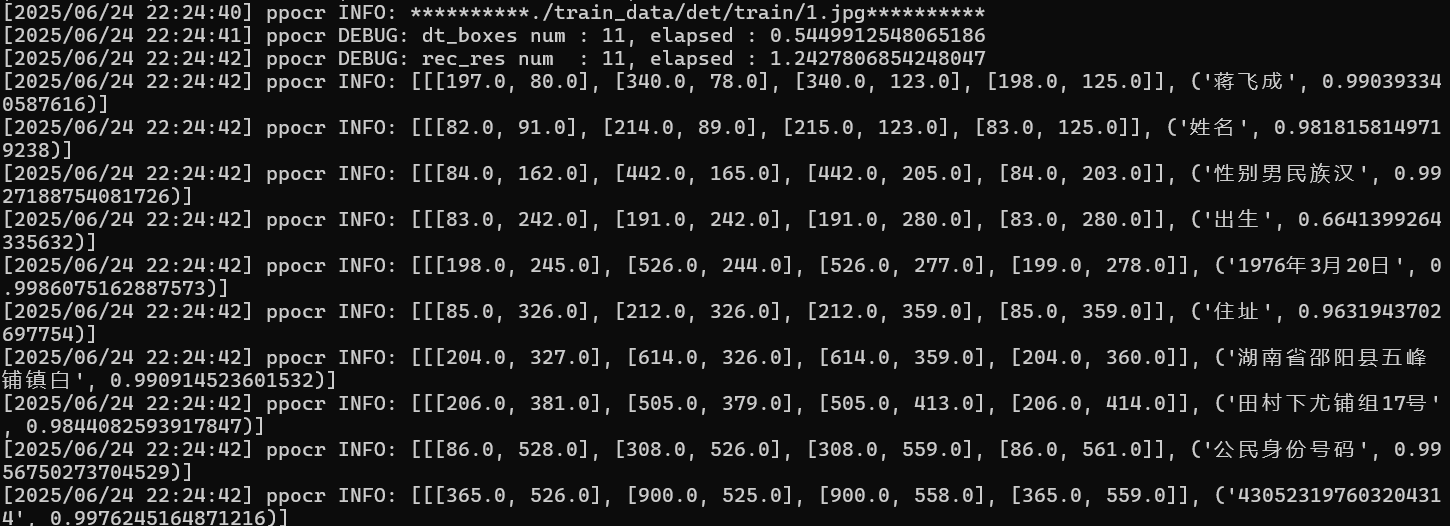
使用paddleLabel去对数据集进行标注,制作训练集
进入paddleLabel文件目录,执行以下脚本
1
2
3
#执行这个脚本,就能启动标注数据交互界面,就需要导入需要标注的图片
python paddleLabel.py
# 就能进入到下面的界面 就能正常标注了
对数据都标注完成后之后,需要进行导出两部分(均用于训练)
- 一部分是标签部分
- 一部分是数据正确值
- 点击下面即可成功导出,导出的文件路径,是paddlelabel的目录一致,文件名为:dian_ocr
使用下面指令进行分割训练集与验证集
1
python gen_ocr_train_val_test.py --trainValTestRatio 8:2 --datasetRootPath 你标注数据导出之后的dian_ocr文件目录
此处有坑:若标注的数据集与训练的在不同的服务器或主机中,此时train.txt文件中保存的路径只会跟标注的主机相同,其中的所有路径都需要更换成训练的主机对应的路径
利用标注数据去训练模型 先去下载文字识别与文字检测的训练模型
https://paddlepaddle.github.io/PaddleOCR/latest/version3.x/pipeline_usage/OCR.html#1-ocr
这里我选择的是paddleocrV4版本的 server轻便部署的服务器版本,我下载到pre_train_model文件夹中
有了训练集数据,还需要配置训练参数:在configs下
- 配置训练det : 文字识别模型 det.cml.yml的配置文件(我的配置如下:主要的修改与重要的配置已标注了)
这里我没有怎么训练,因此不清楚这个参数具体的更改
训练时,保存最好表现模型,是有评估参数的:根据batch步数(当前的train.py脚本必须要有这个参数),根据迭代次数;这个参数可以问gpt怎么修改能正确的保存最好的模型(下面配置文件是训练效果最好的,checkpoints是第一次训练的话不需要填写)
1
2
3
4
5
6
7
8
9
10
11
12
13
14
15
16
17
18
19
20
21
22
23
24
25
26
27
28
29
30
31
32
33
34
35
36
37
38
39
40
41
42
43
44
45
46
47
48
49
50
51
52
53
54
55
56
57
58
59
60
61
62
63
64
65
66
67
68
69
70
71
72
73
74
75
76
77
78
79
80
81
82
83
84
85
86
87
88
89
90
91
92
93
94
95
96
97
98
99
100
101
102
103
104
105
106
107
108
109
110
111
112
113
114
115
116
117
118
119
120
121
122
123
124
125
126
127
128
129
130
131
132
133
134
135
136
137
138
139
140
141
142
143
144
145
146
147
148
149
150
151
152
153
154
155
156
157
158
159
160
161
162
163
164
165
166
167
168
169
170
171
172
173
174
175
176
177
178
179
180
181
182
183
184
185
186
187
188
189
190
191
192
193
194
195
196
197
198
199
200
201
202
203
204
205
206
207
208
209
210
211
212
213
214
215
216
217
218
219
220
221
222
223
224
225
226
227
228
229
230
231
232
233
234
235
236
237
238
239
240
241
242
Global:
  debug: false
  use_gpu: true
  epoch_num: 300
  log_smooth_window: 20
  print_batch_step: 20
  save_model_dir: ./output/ch_PP-OCRv4TrainV3
  save_epoch_step: 10
  eval_batch_step:
  - 0
  - 1000 # 增加评估频率
  cal_metric_during_train: false
  checkpoints: ./output/ch_PP-OCRv4TrainV3/latest
  #pretrained_model: ./pre_train_model/PP-OCRv4_server_det_pretrained.pdparams
  pretrained_model: null
  save_inference_dir: null
  use_visualdl: false
  infer_img: doc/imgs_en/img_10.jpg
  save_res_path: ./checkpoints/det_db/predicts_db.txt
  d2s_train_image_shape: [3, 640, 640]
  distributed: false
Architecture:
  name: DistillationModel
  algorithm: Distillation
  model_type: det
  Models:
    Student:
      model_type: det
      algorithm: DB
      Transform: null
      Backbone:
        name: PPLCNetV3
        scale: 0.75
        pretrained: false
        det: true
      Neck:
        name: RSEFPN
        out_channels: 96
        shortcut: true
      Head:
        name: DBHead
        k: 50
    Student2:
      pretrained: null
      model_type: det
      algorithm: DB
      Transform: null
      Backbone:
        name: PPLCNetV3
        scale: 0.75
        pretrained: true
        det: true
      Neck:
        name: RSEFPN
        out_channels: 96
        shortcut: true
      Head:
        name: DBHead
        k: 50
    Teacher:
      #pretrained: https://paddleocr.bj.bcebos.com/PP-OCRv4/chinese/ch_PP-OCRv4_det_cml_teacher_pretrained/teacher.pdparams
      pretrained: ./pre_train_model/PP-OCRv4_server_det_pretrained.pdparams
      freeze_params: true
      return_all_feats: false
      model_type: det
      algorithm: DB
      Backbone:
        name: ResNet_vd
        in_channels: 3
        layers: 50
      Neck:
        name: LKPAN
        out_channels: 256
      Head:
        name: DBHead
        kernel_list:
        - 7
        - 2
        - 2
        k: 50
Loss:
  name: CombinedLoss
  loss_config_list:
  - DistillationDilaDBLoss:
      weight: 1.0
      model_name_pairs:
      - - Student
        - Teacher
      - - Student2
        - Teacher
      key: maps
      balance_loss: true
      main_loss_type: DiceLoss
      alpha: 5
      beta: 10
      ohem_ratio: 3
  - DistillationDMLLoss:
      model_name_pairs:
      - Student
      - Student2
      maps_name: thrink_maps
      weight: 0.5
      key: maps
  - DistillationDBLoss:
      weight: 1.0
      model_name_list:
      - Student
      - Student2
      balance_loss: true
      main_loss_type: DiceLoss
      alpha: 5
      beta: 10
      ohem_ratio: 3
Optimizer:
  name: Adam
  beta1: 0.9
  beta2: 0.999
  lr:
    name: Cosine
    learning_rate: 0.000665
    warmup_epoch: 2
  regularizer:
    name: L2
    factor: 5.0e-05
PostProcess:
  name: DistillationDBPostProcess
  model_name:
  - Student
  key: head_out
  thresh: 0.3
  box_thresh: 0.6
  max_candidates: 1000
  unclip_ratio: 1.5
Metric:
  name: DistillationMetric
  base_metric_name: DetMetric
  main_indicator: hmean
  key: Student
Train:
  dataset:
    name: SimpleDataSet
    data_dir: ./train_data/
    label_file_list:
      - ./train_data/det/train.txt
    ratio_list: [1.0]
    transforms:
    - DecodeImage:
        img_mode: BGR
        channel_first: false
    - DetLabelEncode: null
    - IaaAugment:
        augmenter_args:
        - type: Fliplr
          args:
            p: 0.5
        - type: Affine
          args:
            rotate:
            - -10
            - 10
        - type: Resize
          args:
            size:
            - 0.5
            - 3
    - EastRandomCropData:
        size:
        - 640
        - 640
        max_tries: 50
        keep_ratio: true
    - MakeBorderMap:
        shrink_ratio: 0.4
        thresh_min: 0.3
        thresh_max: 0.7
        total_epoch: 500
    - MakeShrinkMap:
        shrink_ratio: 0.4
        min_text_size: 8
        total_epoch: 500
    - NormalizeImage:
        scale: 1./255.
        mean:
        - 0.485
        - 0.456
        - 0.406
        std:
        - 0.229
        - 0.224
        - 0.225
        order: hwc
    - ToCHWImage: null
    - KeepKeys:
        keep_keys:
        - image
        - threshold_map
        - threshold_mask
        - shrink_map
        - shrink_mask
  loader:
    shuffle: true
    drop_last: false
    batch_size_per_card: 2
    num_workers: 2
Eval:
  dataset:
    name: SimpleDataSet
    data_dir: ./train_data/
    label_file_list:
      - ./train_data/det/val.txt
    transforms:
    - DecodeImage:
        img_mode: BGR
        channel_first: false
    - DetLabelEncode: null
    - DetResizeForTest:
        limit_side_len: 960
        limit_type: max
    - NormalizeImage:
        scale: 1./255.
        mean:
        - 0.485
        - 0.456
        - 0.406
        std:
        - 0.229
        - 0.224
        - 0.225
        order: hwc
    - ToCHWImage: null
    - KeepKeys:
        keep_keys:
        - image
        - shape
        - polys
        - ignore_tags
  loader:
    shuffle: false
    drop_last: false
    batch_size_per_card: 1
    num_workers: 2
profiler_options: null
之后启动tools/train.py训练脚本即可
1
python tools/train.py -c configs/det/ch_PP-OCRv4/ch_PP-OCRv4_det_cml.yml
- 配置训练rec文字检测模型同理,配置文件相差不会太多:配置文件如下
1
2
3
4
5
6
7
8
9
10
11
12
13
14
15
16
17
18
19
20
21
22
23
24
25
26
27
28
29
30
31
32
33
34
35
36
37
38
39
40
41
42
43
44
45
46
47
48
49
50
51
52
53
54
55
56
57
58
59
60
61
62
63
64
65
66
67
68
69
70
71
72
73
74
75
76
77
78
79
80
81
82
83
84
85
86
87
88
89
90
91
92
93
94
95
96
97
98
99
100
101
102
103
104
105
106
107
108
109
110
111
112
113
114
115
116
117
118
119
120
121
122
123
124
125
126
127
128
129
130
131
132
133
134
135
136
137
138
139
140
Global:
  debug: false
  use_gpu: false
  epoch_num: 200
  log_smooth_window: 20
  print_batch_step: 10
  save_model_dir: ./output/rec_ppocr_v4 #保存模型的路径
  save_epoch_step: 10
  eval_batch_step: [0, 50]
  cal_metric_during_train: true #这个设置为true会报错,无法
  pretrained_model: ./pre_train_model/PP-OCRv4_server_rec_pretrained.pdparams
  checkpoints:
  save_inference_dir:
  use_visualdl: false
  infer_img: doc/imgs_words/ch/word_1.jpg
  character_dict_path: ppocr/utils/ppocr_keys_v1.txt
  max_text_length: &max_text_length 25
  infer_mode: false
  use_space_char: true
  distributed: true
  save_res_path: ./output/rec/predicts_ppocrv3.txt
  d2s_train_image_shape: [3, 48, 320]


Optimizer:
  name: Adam
  beta1: 0.9
  beta2: 0.999
  lr:
    name: Cosine
    learning_rate: 0.001
    warmup_epoch: 5
  regularizer:
    name: L2
    factor: 3.0e-05


Architecture:
  model_type: rec
  algorithm: SVTR_LCNet
  Transform:
  Backbone:
    name: PPLCNetV3
    scale: 0.95
  Head:
    name: MultiHead
    head_list:
      - CTCHead:
          Neck:
            name: svtr
            dims: 120
            depth: 2
            hidden_dims: 120
            kernel_size: [1, 3]
            use_guide: True
          Head:
            fc_decay: 0.00001
      - NRTRHead:
          nrtr_dim: 384
          max_text_length: *max_text_length

Loss:
  name: MultiLoss
  loss_config_list:
    - CTCLoss:
    - NRTRLoss:

PostProcess:
  name: CTCLabelDecode

Metric:
  name: RecMetric
  main_indicator: acc

Train:
  dataset:
    name: MultiScaleDataSet
    ds_width: false
    data_dir: ./train_data/
    ext_op_transform_idx: 1
    label_file_list:
    - ./train_data/rec/train.txt
    transforms:
    - DecodeImage:
        img_mode: BGR
        channel_first: false
    - RecConAug:
        prob: 0.5
        ext_data_num: 2
        image_shape: [48, 320, 3]
        max_text_length: *max_text_length
    - RecAug:
    - MultiLabelEncode:
        gtc_encode: NRTRLabelEncode
    - KeepKeys:
        keep_keys:
        - image
        - label_ctc
        - label_gtc
        - length
        - valid_ratio
  sampler:
    name: MultiScaleSampler
    scales: [[320, 32], [320, 48], [320, 64]]
    first_bs: &bs 9
    fix_bs: false
    divided_factor: [8, 16] # w, h
    is_training: True
  loader:
    shuffle: true
    batch_size_per_card: 2
    drop_last: true
    num_workers: 4
Eval:
  dataset:
    name: SimpleDataSet
    data_dir: ./train_data
    label_file_list:
    - ./train_data/rec/val.txt
    transforms:
    - DecodeImage:
        img_mode: BGR
        channel_first: false
    - MultiLabelEncode:
        gtc_encode: NRTRLabelEncode
    - RecResizeImg:
        image_shape: [3, 48, 320]
    - KeepKeys:
        keep_keys:
        - image
        - label_ctc
        - label_gtc
        - length
        - valid_ratio
  loader:
    shuffle: false
    drop_last: false
    batch_size_per_card: 2
    num_workers: 4
之后启动tools/train.py训练脚本即可
1
python tools/train.py -c configs/rec/PP-OCRv4/ch_PP-OCRv4_rec.yml
训练服务器
modelscope的免费资源GPU额度的远端服务器我的Notebook · 魔搭社区
需要有阿里云的账号资源,在我的Notebook里面,可以免费额度使用GPU环境;工作目录是nmt/workspace,能持久化保存用户上传的信息;后续敏感信息需要全部删除
踩坑:
此时我使用远端服务器的配置去训练,此时训练批次无法再提升
1
2
3
4
5
6
7
8
 batch_size_per_card: 1 #批处理大小:设置的非常小,才能正常运行 import cv2
,要满足这个步骤的
# 只能是1 是2都不行,都会报错

 #会报错不仅是以下的错误:
1、 Caught ValueError in DataLoader worker process 0、 too many values to unpack (expected 9)
2、all input arrays must have the same shape
3、AssertionError: The length of ratio_list should be the same as the file_list.
#####
训练完成 尝试运行训练模型去识别此时图片,查看训练成果
会分别在配置文件配置的save_model_dir目录保存此时训练好表现最好的模型在设定目录下的best_model目录下
此时分别对det、rec执行脚本,就能查看此时训练模型是否符合预期,若不行,就调整参数,继续训练
1
2
3
4
5
6
7
8
#det
python tools/infer_det.py -c configs/det/ch_PP-OCRv4/ch_PP-OCRv4_det_cml.yml -o Global.pretrained_model=./pre_train_model/PP-OCRv4_server_det_pretrained.pdparams Global.infer_img="./train_data/det/train/5.jpg"

python tools/infer_det.py -c configs/det/ch_PP-OCRv4/ch_PP-OCRv4_det_cml.yml -o Global.pretrained_model="./output/ch_PP-OCRv4/best_model/model.pdparams" Global.infer_img="./train_data01/det/train/5.jpg"


#rec
python tools/infer_rec.py -c configs/rec/PP-OCRv4/ch_PP-OCRv4_rec.yml -o Global.pretrained_model=/更换为训练导出之后的模型 Global.infer_img="./train_data/det/train/5.jpg"
在训练过程中,是可以看到此时predect的识别率等等信息,然后几次迭代之后,才会突破最高的识别检测率等等
此处训练出来的模型,可能会有多种的问题,能两种办法解决这个问题:
- 在服务端进行动态识别;若此时获取到最后一次元素索引,不是身份证号的话,就取倒数第二个的
- 再次训练模型,让检测模型继续优化,达到目的
1
2
3
4
5
6
# 继续训练的话,需要将pretrained_model 参数置空,将checkpoints换成上一次训练好的best_model保存好的训练权重,继续训练,否则会出现丢失权重参考值,之后训练的评估,所有模型的hmean: 0 precision: 0.0,recall: 0.0,

checkpoints :# 用于加载回已训练好的权重
#1、训练未完成的,只需要加载latest的权重,不需要更改保存模型路径

#2、训练完成,但是效果不满意的,要加载best_model的权重,在这基础上,更改保存模型路径,再次训练
直到此时模型表现达到自己满意之后,就能导出为可部署的推理模型
执行下面脚本即可 最终就能成功导出能部署、可使用的推理模型
1
2
3
4
5
#det
python tools/export_model.py -c "./configs/det/ch_PP-OCRv4/ch_PP-OCRv4_det_cml.yml" -o Global.pretrained_model="./output/ch_PP-OCRv4TrainV3/best_model/model.pdparams"   Global.save_inference_dir="./temp_best_model2/det/"

#rec
python tools/export_model.py -c "./configs/rec/ch_PP-OCRv4/ch_PP-OCRv4_rec.yml" -o Global.pretrained_model="./output/Train/best_model/model.pdparams" Global.save_inference_dir="./inference_model/rec/"
之后会在对应save_inference_dir设置的路径下生成对应模型,在服务器中使用
1
2
3
4
# 压缩文件
rar a -r  文件名.rar 目录名

#直接下载即可 或者安装包 rz sz等等工具包
适配的requirements.txt paddlepaddle 3.0.0 paddleocr 2.10.0
albucore==0.0.13
albumentations==1.4.10
annotated-types==0.7.0
anyio==4.8.0
astor==0.8.1
beautifulsoup4==4.13.3
certifi==2025.1.31
charset-normalizer==3.4.1
click==8.1.8
contourpy==1.3.1
cycler==0.12.1
Cython==3.0.12
decorator==5.2.1
dotenv==0.9.9
fastapi==0.115.12
filelock==3.18.0
fire==0.7.0
fonttools==4.56.0
fsspec==2025.3.0
h11==0.14.0
httpcore==1.0.7
httpx==0.28.1
huggingface-hub==0.29.3
idna==3.10
imageio==2.37.0
imgaug==0.4.0
Jinja2==3.1.6
joblib==1.4.2
kiwisolver==1.4.8
lazy_loader==0.4
lmdb==1.6.2
lxml==5.3.1
markdown-it-py==3.0.0
MarkupSafe==3.0.2
matplotlib==3.10.0
mdurl==0.1.2
mpmath==1.3.0
networkx==3.4.2
numpy==1.26.4
opencv-contrib-python==4.11.0.86
opencv-python==4.11.0.86
opencv-python-headless==4.11.0.86
opt-einsum==3.3.0
packaging==24.2
pillow==11.1.0
protobuf==3.20.2
pyclipper==1.3.0.post6
pydantic==2.10.6
pydantic_core==2.27.2
paddleocr==2.10.0 // paddleocr是2.10.0版本
Pygments==2.19.1
pyparsing==3.2.1
python-dateutil==2.9.0.post0
python-docx==1.1.2
python-dotenv==1.1.0
python-json-logger==3.3.0
python-multipart==0.0.20
RapidFuzz==3.12.1
requests==2.32.3
rich==13.9.4
safetensors==0.5.3
scikit-image==0.25.2
scikit-learn==1.6.1
scipy==1.15.2
shapely==2.0.7
shellingham==1.5.4
six==1.17.0
sniffio==1.3.1
soupsieve==2.6
starlette==0.46.1
sympy==1.13.1
termcolor==2.5.0
threadpoolctl==3.5.0
tifffile==2025.2.18
timm==1.0.15
tomli==2.2.1
torch==2.6.0
torchaudio==2.6.0
torchvision==0.21.0
tqdm==4.67.1
typer==0.15.2
typing_extensions==4.13.0
urllib3==2.3.0
uvicorn==0.34.0

# 新增的依赖项
python-bidi
Polygon3
lanms-neo
visualdl
有了推理模型,部署到服务器 FastAPI + OCR搭建项目
这里我使用pycharm去开发我的python项目
首先是配置之前配置好的conda环境,让pycharm能在自己的环境下运行
setting -> Project/model -> Python interpreter -> add interpreter -> conda -> 选择自己创建好的虚拟环境名即可 配置虚拟环境
Tools/Terminal -> Shell path: cmd.exe在pycharm终端使用默认conda界面
python项目如何全局使用logger日志
首先,就使用python原生的logger;随后进行配置:这里不赘述
其次是python的logger库是可以根据模块进行区分的,也就是说,此时我可以定义ocr模块去初始化一个新的logger实体,也可以定义image模块去初始化一个新的logger实体;因此此时我在utils/log模块,定义一个模块内部的logger对象,里面装着很多不同模块的日志实体
1
2
3
4
5
6
7
8
9
10
11
12
13
14
15
# 全局日志记录器字典,用于缓存已创建的日志记录器
# utils/log.py

import logging
import os
import logging.handlers
from pythonjsonlogger import jsonlogger  # 修正导入名称

_loggers = {}
def get_logger(name: str = "app") -> logging.Logger:
    ...

# 这里我只定义一个logger实体,用于全局使用
app_logger = get_logger()
- 此时外部的各个模块如果想使用这个实体,直接使用
from utils.log import app_logger
踩坑
python的__init__.py文件,是可以让当前目录,被编译器识别为包,从而可以让其余模块使用目录名+文件名的方式去加载到对应模块的;当时的日志实体的导入使用,就会报错:ModuleNoFound:utils.log,只要有这个文件即可,可以为空
使用FastAPI + uvicorn去搭建代码环境
这里为了实现开发时的热重载,使用uvicorn.run的方法
创建FastAPI的实例 注册服务路由
1
2
3
4
5
6
7
8
9
10
11
12
13
14
15
16
17
18
19
20
21
22
23
24
25
26
27
28
29
30
31
32
# 创建FastAPI实例 并返回出去 让uvicorn.run函数能启动
# apps/__init__.py
def create_app() -> FastAPI:
    """
    创建FastAPI
    返回FastAPI入口
    """
    try:
        app_logger.info("-->model/apps/__init__.py create_app")

        # 创建FastAPI实例
        app = FastAPI()
        # 注册OCR服务路由
        app.include_router(ocr_router, prefix="/api", tags=["OCR"])

        return app

    except Exception as e:
        app_logger.error(f"create_app error: {e}")
        raise  # 重新抛出异常

app = create_app()


# 创建服务路由
# apps/ocr/router.py
ocr_router = APIRouter(tags=["OCR"])

@ocr_router.post("/idCardRecognition")
async def idCardRecognition(file: UploadFile = File(...)):
    ...
- 会报以下错:
1
2
3
4
5
6
7
8
9
10
11
12
 # 原因是此时uvicorn创建时,需传入创建的实例,如果是热重载模式的话:需要传入路径+实例名字
 Error loading ASGI app. Could not import module "app".

# 例:
  uvicorn.run(
                "apps:app",  # 使用字符串格式支持热重载
                host=host,
                port=port,
                reload=True,  # 启用热重载
                reload_dirs=["apps"],  # 明确指定监控的目录
                reload_includes=["*.py"]  # 监控所有 Python 文件
            )
python读取配置文件的方式,就是去读取里面的json文件 保存一个模块级别的变量,若存在的话,就不需要重复实例化
1
2
3
4
5
6
7
8
9
10
11
12
13
14
15
16
17
18
19
20
21
22
23
24
25
26
27
28
29
30
31
32
33
34
35
36
37
38
39
import json
import os

_config = None  # 使用模块级变量而非全局变量


def load_config(file_path=".cfg_config.json") -> dict:
    """加载配置文件并返回字典"""
    global _config  # 声明为全局变量

    try:
        # 检查文件是否存在
        if not os.path.exists(file_path):
            raise FileNotFoundError(f"配置文件 {file_path} 不存在")

        # 打开文件并解析 JSON
        with open(file_path, "r", encoding="utf-8") as f:
            _config = json.load(f)
        return _config
    except json.JSONDecodeError as e:
        raise RuntimeError(f"JSON 格式错误: {e}")
    except Exception as e:
        raise RuntimeError(f"读取配置失败: {e}")


def get_config() -> dict:
    """获取配置字典(如果未加载则自动加载)"""
    global _config
    if _config is None:
        load_config()
    return _config


# 初始化配置
try:
    load_config()
except RuntimeError as e:
    print(f"⚠️ 配置初始化失败: {e}")
    _config = {}  # 提供空配置作为回退
实现利用Paddleocr包,去识别图片信息的服务接口
创建ocr包,创建这个ocr服务的类对象,里面处理属于image的接口;由于是需要重复使用到ocr实体去调用其的识别的方法,因此python这里是利用class的方法,将实体封装到类中,利用类方法去实例化这个实体,从而去调用他的方法
1
2
3
4
5
6
7
8
9
10
11
12
13
14
15
# 使用继承抽象类 ABC 的方法去实现类的抽象方法,能提供同一方法,不同实现,参考C++
# ocr/interface.py
from abc import ABC, abstractmethod

class ocr_interface(ABC):
    """
    用于暴露出去实现身份证文本检测加识别
    """

    @abstractmethod
    def id_recognition(self, image_stream):
        pass
这里由于训练好的是文本检测模型,会自动检测豪彬划好训练数据的区域,因此返回的数据格式是一样的,因此可以直接取出里面的数据所在索引,取出关键信息;其中将线程移动至类方法中,便于函数内部控制线程的存活时间等等
1
2
3
4
5
6
7
8
9
10
11
12
13
14
15
16
17
18
19
20
21
22
23
24
25
26
27
28
29
30
31
32
33
34
35
36
37
38
39
40
41
42
43
44
45
46
47
48
49
50
51
52
53
54
55
56
57
58
59
60
61
62
63
64
65
66
67
68
69
70
71
72
73
74
75
76
77
78
79
80
81
82
83
84
85
86
87
88
89
90
91
92
93
94
95
96
97
98
99
100
101
102
103
104
105
106
107
108
109
110
111
112
113
114
115
116
117
118
119
120
121
122
123
124
125
126
127
128
129
130
131
132
133
134
135
136
137
138
# ocr/service.py

...
from apps.ocr.interface  import ocr_interface
from paddleocr import PaddleOCR
...
class OCRService(ocr_interface):
     def __init__(self,det_model_dir:str,rec_model_dir:str,use_gpu:bool=False):
        self.ocr_engine = PaddleOCR(
            lang='ch',
            det_model_dir=det_model_dir,
            rec_model_dir=rec_model_dir,
            use_gpu=use_gpu,
            use_angle_cls=True  # 是否启用角度分类器
        )
        ...

	    def id_recognition(self, image_stream:np.ndarray):
        """执行OCR识别并返回结构化结果"""
        text =  self.ocr_engine.ocr(image_stream, cls=False)
        app_logger.info(f"recognition text:{text}")

        if None in text:
            app_logger.error(f"cannot recognize text")
            raise Exception("cannot recognize text")

        # 获取第一个文字框的四个坐标点
        first_box = text[0][0][0]
        last_box = text[-1][-1][0]

        app_logger.info(f"第一组坐标点为:{first_box}", )
        app_logger.info(f"最后一组的坐标点为:{last_box}")

        # 估算身份证区域
        idcard_box = estimate_idcard_bbox_from_name_and_id(first_box, last_box)
        app_logger.info(f"估算的坐标:{idcard_box}")
        # # 显示结果 测试时候使用
        draw_and_save_bbox(image_stream, idcard_box)

        result = self.extract_ocr_data(text)

        return result

    async def safe_id_recognition(self, image_data: np.ndarray) -> Dict[str, Any]:
        """线程安全的OCR识别方法,正确处理异常"""
        try:
            # 在单独线程中执行阻塞操作
            data = await asyncio.to_thread(self.id_recognition, image_data)
            return {"code": 200, "data": data}

        except Exception as e:
            # 记录完整的错误堆栈[2,5](@ref)
            error_trace = traceback.format_exc()
            app_logger.error(f"OCR识别失败: {str(e)}\n堆栈跟踪:\n{error_trace}")

            # 返回结构化的错误响应
            return {
                "code": 500,
                "error": "OCR处理失败",
                "detail": str(e),
                "trace": error_trace.splitlines()[-1]  # 返回最后一行错误信息
            }

    def extract_ocr_data(self,data: List) -> Dict[str, Union[str, float, Dict]]:
        try:
            # 1. 验证顶级结构
            if not isinstance(data, list) or len(data) < 1:
                raise ValueError("顶级结构必须是包含至少一个元素的列表")

            # 2. 提取第一层结果组
            result_group = data[0]
            if not isinstance(result_group, list) or len(result_group) < 2:
                raise ValueError("识别结果组必须包含至少两个识别项")

            # 3. 提取姓名项(第一个元素)
            first_item = result_group[0]
            self._validate_item_structure(first_item, "姓名")
            name, name_confidence = self._extract_text_data(first_item[1])

            # 4. 提取身份证项(最后一个元素)
            last_item = result_group[-1]
            self._validate_item_structure(last_item, "身份证")
            id_number, id_confidence = self._extract_text_data(last_item[1])

            # 5. 身份证格式验证
            validate_id_number(id_number)

            # 6. 置信度检查
            warnings = {}
            if name_confidence < 0.8:
                warnings["name_low_confidence"] = name_confidence
            if id_confidence < 0.9:
                warnings["id_low_confidence"] = id_confidence

            gender_num = id_number[-2]
            int_gender_num = int(gender_num)
            gender = '男'
            if int_gender_num % 2 == 0:
                gender = '女'

            result = {
                "name": name,
                "id_number": id_number,
                "gender": gender,
            }
            if warnings:
                result["warnings"] = warnings

            return result

        except (ValueError, IndexError, TypeError, AttributeError) as e:
            app_logger.error(f"解析失败: {str(e)}")
            return {
                "error": f"数据结构异常: {str(e)}",
                "raw_data": data  # 返回原始数据便于调试
            }

    def _validate_item_structure(self,item: List, field_name: str) -> None:
        """验证识别项的基础结构"""
        if len(item) != 2:
            raise ValueError(f"{field_name}项必须包含坐标组和识别结果")

        if not isinstance(item[1], (list, tuple)):
            raise TypeError(f"{field_name}识别结果必须是列表或元组")

        if len(item[1]) != 2:
            raise ValueError(f"{field_name}识别结果长度必须为2")

    def _extract_text_data(self,text_data: Union[List, Tuple]) -> Tuple[str, float]:
        """从识别结果中提取文本和置信度"""
        text, confidence = text_data
        if not isinstance(text, str):
            raise TypeError("识别文本必须是字符串类型")
        if not isinstance(confidence, (int, float)):
            raise TypeError("置信度必须是数值类型")
        return text, float(confidence)
处理来自网络请求的图片,将其转化为ocr接口适用的图片格式ocr/imagehandler.py
查看ocr函数的传参要求。因此需要将file -> io.BytesIO -> np.ndarray 的一个过程,后续要拓展的话,可以接收对象存储的图片URL,文件路径等等,原理是一样的;这里只展示字节流与URL
1
2
3
4
5
6
7
8
9
10
11
12
13
14
15
16
17
18
19
20
21
22
23
24
25
26
27
28
29
30
31
32
33
34
35
36
37
38
39
40
# paddleocr/paddleocr.py
img: Image for OCR. It can be an ndarray, img_path, or a list of ndarrays.


# 这里使用 cv2 跟PIL image包,对图片字节流进行处理(python处理图片的包很强大)
def read_image_from_stream(image_stream: io.BytesIO)-> np.ndarray:
    """
    将图片文件流转化成多维数组
    :param image_stream: 图片文件流
    :return:
    """
    try:
        if image_stream is None:
            app_logger.error("image_stream is None")
            raise Exception("image_stream is None")
        # 查看是否为空
        if image_stream.getbuffer().nbytes == 0:
            app_logger.error("image_stream is empty while it shouldn't")
            raise Exception("image_stream is empty while it shouldn't ")
        image = Image.open(image_stream).convert('RGB')  # 转 PIL

        # 转化为多维数组
        image_np = np.array(image)

        image_cv = cv2.cvtColor(image_np, cv2.COLOR_RGB2BGR)  # 转 OpenCV BGR
        return image_cv
    except Exception as e:
        app_logger.error(f"read_image_from_stream error: {e}")
        raise e


...
# 处理对象存储的URL
import requests
def url_to_ndarray(image_url: str) -> np.ndarray:
    response = requests.get(image_url)
    img_bytes = BytesIO(response.content).read()
    nparr = np.frombuffer(img_bytes, np.uint8)
    img = cv2.imdecode(nparr, cv2.IMREAD_COLOR)
    return img
自动化部署脚本:由于gitee仓库无法上传单一文件大于100MB的,因此这里只做gitlab自动化部署介绍
首先是填写yml的流水线,先deploy后release
deploy时,使用DockerFile构建好应用镜像,在构建镜像时,就准备好paddlepaddle的包环境,还有基本的python环境:以下是豪彬的Dockerfile(实际上可以将paddleocr也在此处安装好)
1
2
3
4
5
6
7
8
9
10
11
12
13
14
15
16
17
18
19
20
21
22
23
FROM python:3.10-slim

WORKDIR /app

COPY requirements.txt ./

RUN apt-get update && apt-get install -y \
    libgomp1 \
    libglib2.0-0 \
    libsm6 \
    libxext6 \
    libxrender1 \
    libgl1 \
 && rm -rf /var/lib/apt/lists/*

RUN pip install --no-cache-dir -r requirements.txt
RUN pip install --no-cache-dir paddlepaddle -i https://pypi.tuna.tsinghua.edu.cn/simple
RUN pip install --no-cache-dir opencv-contrib-python

COPY . .

CMD ["python", "main.py"]
release时,就需要进入到服务器终端一致,需要获取此时装载应用程序的容器名称,重新构建,使用Dockerfile文件创建的自己的镜像去创建,就拥有此时自己额外配置的环境;
1
2
3
4
5
6
7
8
9
10
# deploy.sh
d run --gpus all --name "$SVC_NAME" \
  -d --restart=always \
  -p $SVC_PORT:$SVC_PORT \
  -v deploy:/var/deploy \
  -v data:/var/data \
  -w $DEPLOY_TARGET_PATH \
  --network qnear \
  app_model:latest "${DEPLOY_TARGET_PATH}/run.sh"